AirBeam is a low-cost, palm-sized air quality instrument that measures hyperlocal concentrations of harmful microscopic particles in the air.
Hardware Specifications
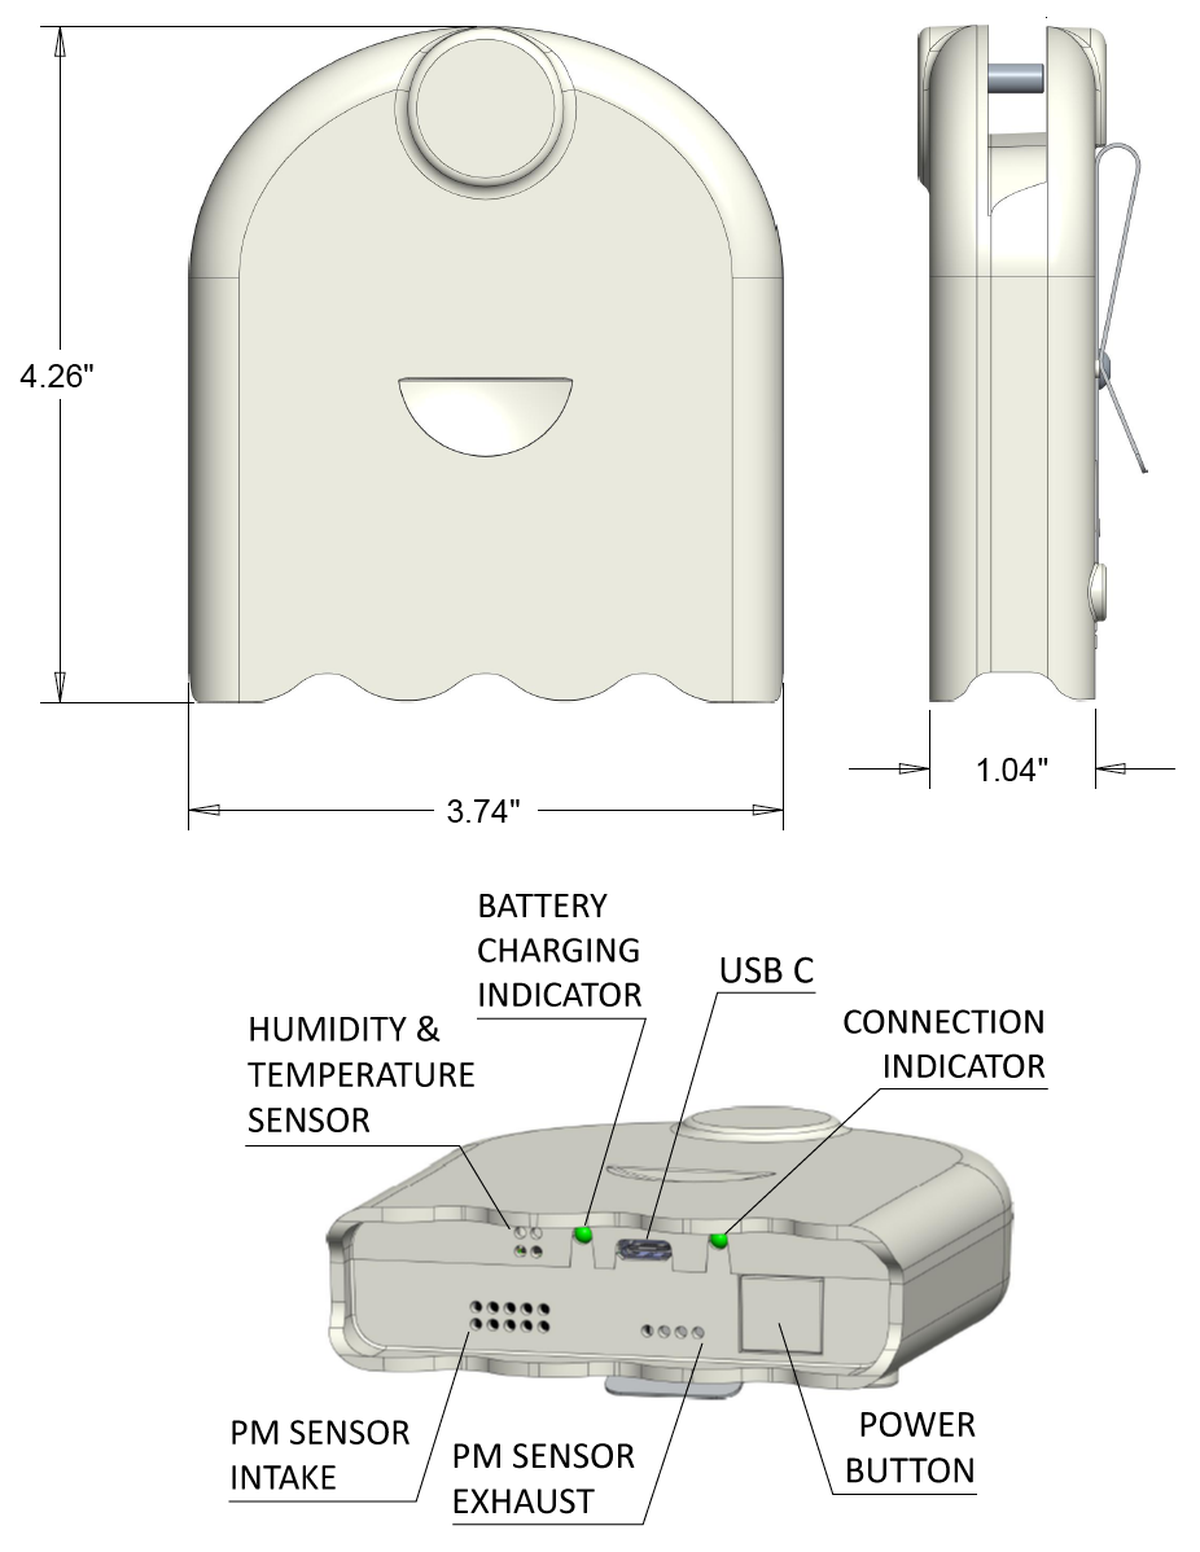
Weight: 6 ounces
Particle Sensor: Plantower PMS7003
Relative Humidity & Temperature Sensor: Texas Instruments, HDC1080DMBR
Bluetooth, WiFi & Microcontroller: Espressif, ESP32-WROOM-32D
4G Cellular & GPS: Quectel, LTE BG95-M3
MicroSD Card: OEM, 32GB Class 10 formatted to FAT32
Real Time Clock: NXP USA, PCF2129T/2,518
Battery: PKCell, ICR18650 3350mAh 3.7V
About AirBeam3
AirBeam3 is a palm-sized air quality instrument weighing six ounces that measures PM1, PM2.5, PM10, temperature, and relative humidity. Its weather resistant enclosure makes it suitable for indoor or outdoor use. It can communicate via BLE, WiFi, or cellular 4G and can be used as a stationary or mobile monitor. Users can map and graph the measurements from AirBeam3 in real-time using an Android or iOS device or the AirCasting website. AirBeam3 includes an onboard GPS, real-time clock, SD card, and battery so after configuration it can operate in standalone mode, i.e. without the need for any additional hardware, such as a smartphone. The performance of the predecessors to the AirBeam3, AirBeam1 & 2, were both positively evaluated by South Coast Air Quality Management Districts’s AQ-SPEC program and testing to date indicates AirBeam3’s performance exceeds that of its predecessors. AirBeam3 is open-source as is the AirCasting platform software.
Power
AirBeam3 has a 3350 mAh 3.7V rechargeable lithium battery that can power the instrument for approximately 17 hours when fully charged. The battery charges via the USB-C Port, which can also be used to power the AirBeam3 directly. The Battery Charging Indicator turns solid green when the AirBeam3 is charging and turns off when the AirBeam3 is either fully charged or unplugged.
Power On/Off
To power on the AirBeam3, press down on the Power Button. The AirBeam3 is on when the Connection Indicator lights up. Push the Power Button a second time to power off the AirBeam3.
Intake & Exhaust
While operating the AirBeam3, keep the Intake and Exhaust free from obstructions.
Record Measurements – Mobile (Bluetooth) Session
- Download the AirCasting app from the Google Play store or Apple App Store.
- Launch the app and sign in or create a profile.
- Tap the “+” button at the bottom of the screen then tap “Mobile session” and follow the on screen instructions.
When recording a mobile session with AirBeam3, measurements are communicated once a second to the AirCasting app via Bluetooth. The device running the AirCasting app must stay within 10-20 feet of the AirBeam3 to maintain the Bluetooth connection and receive data from the AirBeam3. After recording a mobile session for more than 2 hours, your measurements will be integrated into 5-second averages. After recording a mobile session for more than 9 hours, your measurements will be integrated into 1-minute averages.
Record Measurements – Fixed (WiFi) Session
- Download the AirCasting app from the Google Play store or Apple App Store.
- Launch the app and sign in or create a profile.
- Tap the “+” button at the bottom of the screen then tap “Fixed session” and follow the on screen instructions.
When recording a fixed WiFi session with AirBeam3, the measurements are communicated once a minute to the AirCasting website via WiFi. The Android or iOS device no longer needs to be in proximity to the AirBeam3 as it’s retrieving the data from the web via the Android or iOS device’s WiFi or cellular connection. AirBeam3 must be connected to the 2.4 GHz band of your WiFi network; it cannot connect via the 5 GHz band.
Record Measurements – Fixed (Cellular) Session
- Unscrew the AirBeam3 enclosure, slide your activated Nano SIM card into the SIM card slot located directly above the power switch (insert the SIM card so the chip side is against the board and the clipped corner is oriented towards the power button), then screw the AirBeam3 together again. To maintain the AirBeam3s weather resistance, screw the bottom two screws tight before tightening the top screw into the aluminum standoff; do not overtighten.
- Download the AirCasting app from the Google Play store or Apple App Store.
- Launch the app and sign in or create a profile.
- Tap the “+” button at the bottom of the screen then tap “Fixed session” and follow the on screen instructions.
When recording a fixed cellular session, the measurements are communicated once a minute to the AirCasting website via the 4G cellular network. The Android or iOS device no longer needs to be in proximity to the AirBeam3 as it’s retrieving the data from the web via the Android or iOS device’s WiFi or cellular connection. AirBeam3 data and messaging costs are approximately $25 per month when using a Ting SIM card.
Connection Indicator Color Key
- Solid Green, for 180 seconds = ready to be configured, waiting for Bluetooth connection
- Solid Blue = Bluetooth connected
- Solid White, for 120 seconds = AirBeam3 successfully configured and sending data
- Blink White, once every ten seconds = Bluetooth connected and transmitting data
- Blink Yellow, once every ten seconds = standalone mode, Bluetooth disconnected, GPS fix missing
- Blink Orange, once every ten seconds = standalone mode, Bluetooth disconnected, GPS fix present
- Blink Magenta, once every ten seconds = low power indicator, plug in your AirBeam
- Solid Cyan = SD card syncing
When powered on, AirBeam3 will enter and remain in configuration mode for three minutes. During the configuration window, if you don’t connect to the AirBeam3 via Bluetooth, AirBeam3 will load it’s last known configuration. To enter configuration mode again, simply turn your AirBeam3 off and then back on.
Standalone Mode
When recording a mobile session with AirBeam3, you can separate the AirBeam3 from your Android or iOS device and continue recording, geolocating, and timestamping your measurements. To do this, tap the three horizontal dots located in the upper right hand corner of the session card, map, or graph and tap “Enter standalone mode”. After entering standalone mode, the connection indicator will blink yellow when you don’t have a GPS fix and blink orange when you do have a GPS fix. When you don’t have a GPS fix, your measurements will be pinned to your last know location. To get a GPS fix, move outside to a location with a clear view of the sky. In some instances, it can take 5-10 minutes before the AirBeam3 gets a GPS fix. Note that an iPhone 8 or higher or an Android 8 or higher plus Bluetooth 5 device is required to utilize the Standalone Mode and Sync SD Card features.
Sync SD Card
Whenever your AirBeam3 is recording a mobile or fixed session, it will log data to its SD card. In instances where your AirBeam is connected to the app via Bluetooth (mobile sessions) or sending data via either the WiFi or cellular network directly to the AirCasting server (fixed sessions), the data on the SD card duplicates the data already submitted to and saved in the AirCasting database. However, if when recording a mobile session you enter standalone mode, or when recording a fixed session the AirBeam3s cellular or WiFi connection is interrupted, you can sync the AirBeam3s SD card to retrieve your data. To do this either a) tap the “finish recording & sync” button on your mobile session card; or b) tap the “+” button at the bottom of the screen then tap “Sync data from AirBeam3” and follow the on screen instructions. After syncing the session data from your SD card to the AirCasting database, the SD card will be deleted. Note that an iPhone 8 or higher or an Android 8 or higher plus Bluetooth 5 device is required to utilize the Standalone Mode and Sync SD Card features.
Temperature & Humidity Measurements
AirBeam3 measures the temperature and relative humidity inside the AirBeam3 enclosure. These measurements are not representative of the ambient temperature and relative humidity.
Acquire AirBeam3 Data via Serial Monitor
You can acquire the AirBeam3 data via the USB-C Port using a serial monitor.
Programming
You can reprogram your AirBeam3 using the Arduino IDE.
FCC Compliance Statement
This device complies with part 15 of the FCC Rules. Operating is subject to the following two conditions: (1) This device may not cause harmful interference, and (2) this device must accept any interference received, including interference that may cause undesired operation. Caution: Modifying or tampering with internal components can cause a malfunction and will void FCC authorization to use these products.
AirBeam3 Performance Data
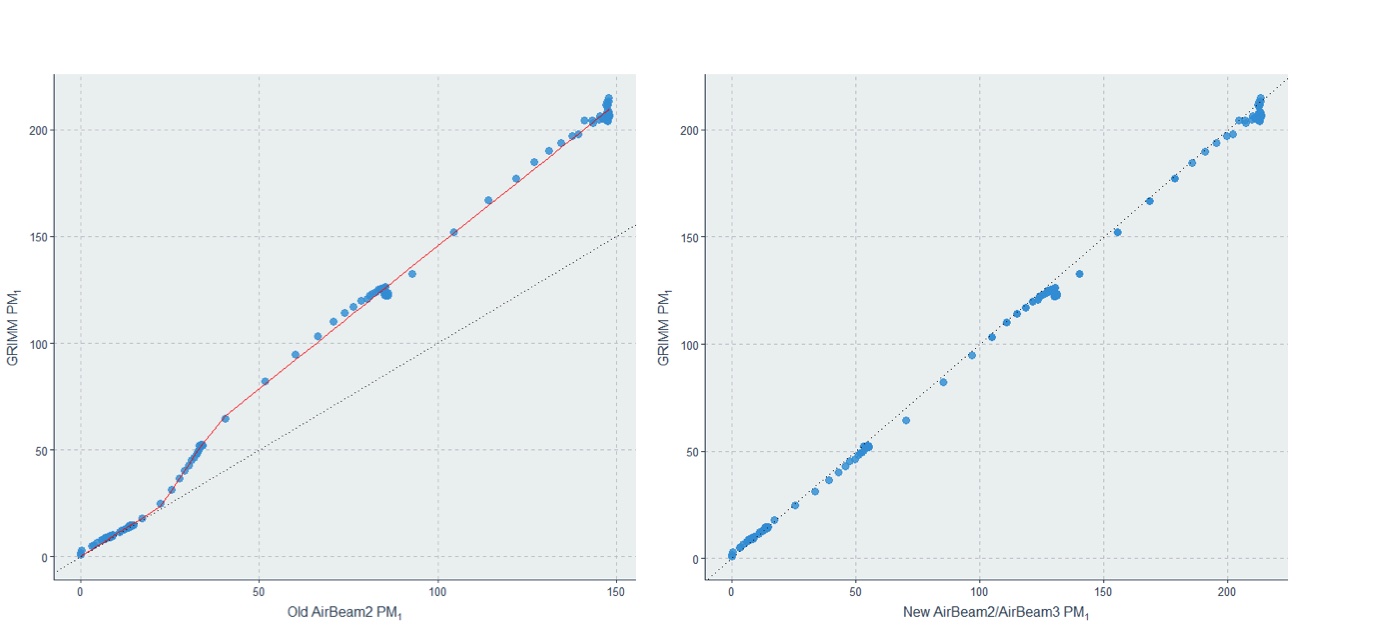
The performance of the predecessor to the AirBeam3, AirBeam2, was positively evaluated by South Coast Air Quality Management District’s AQ-SPEC program and testing to date indicates AirBeam3’s performance exceeds that of its predecessor. To create the AirBeam3 calibration equations for PM1 and PM2.5 we used the laboratory test results from the AirBeam2’s AQ-SPEC evaluation, wherein AirBeam2 measurements were compared to measurements from a GRIMM Federal Equivalency Method instrument. Both AirBeam2 and AirBeam3 utilize the same particulate matter sensor: the Plantower PMS7003
To develop the AirBeam3 calibration equation for PM1, we first reverted the AirBeam2s PM1 calibrations to get back to the sensor manufacturer’s default “ambient” PM1 measurements. Next, we fit the AirBeam2s default PM1 measurements against the GRIMM PM1 values by fitting a piecewise linear regression model at breakpoints (identified using ‘segmented’ package in R) to generate the AirBeam3 PM1 calibration equation. After doing this, the newly fitted AirBeam2 PM1 values show highly linear agreement with GRIMM PM1 values; see below figures illustrating the fit before and after. (Note, in the figures below, the red line is the piecewise regression, and the dotted black lines depict a line with slope=1.)
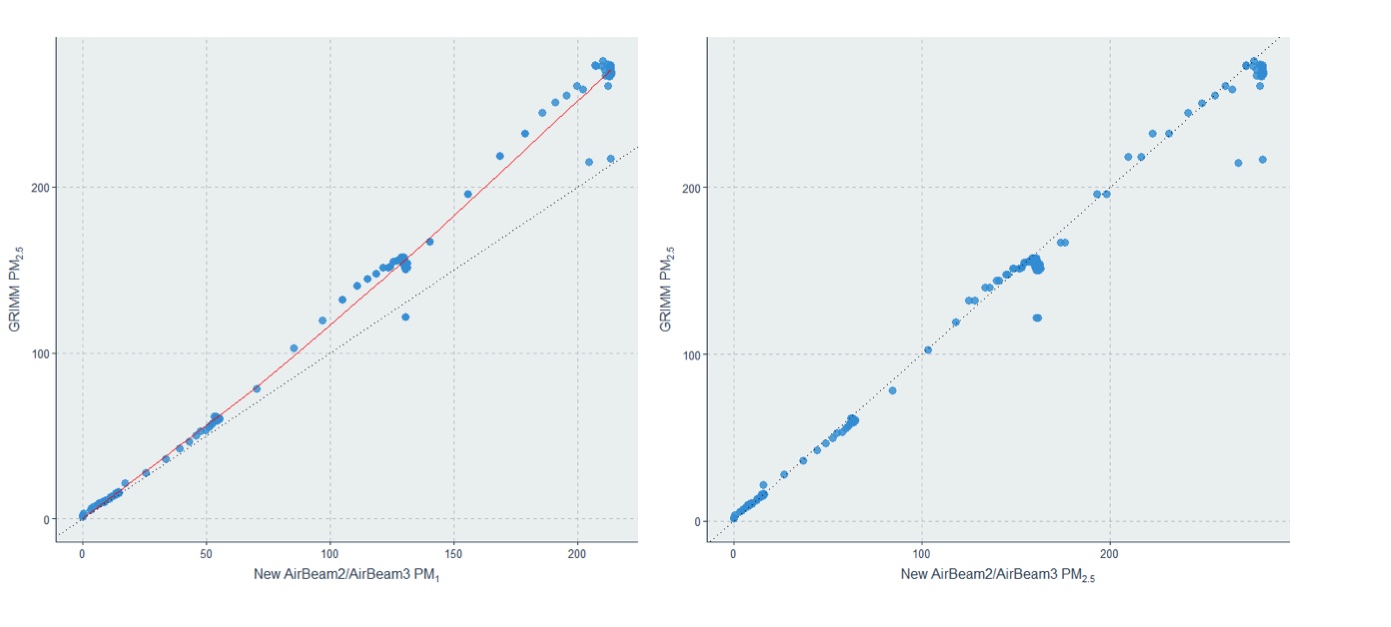
Next, we fit the newly calibrated PM1 measurements from AirBeam2 against the GRIMM PM2.5 measurements (again using a piecewise linear regression model) to generate the AirBeam3 PM2.5 calibration equation. We used the newly fit AirBeam2 PM1 calibration to fit the PM2.5 model since it performed better than using the AirBeam2 PM2.5 measurements. The newly fitted AirBeam2 PM2.5 values show highly linear agreement with GRIMM PM2.5 values; see below figures illustrating the fit before and after.
Finally, since AirBeam2 PM10 measurements did not show good agreement with the GRIMM PM10 measurements gathered during the lab test, we instead fit a piecewise regression against the BAM Federal Equivalency Method instrument it was collocated with during South Coast Air Quality Management District’s field evaluation of the AirBeam2. However, after the calibration the agreement was still relatively poor, suggesting that AirBeam3 PM10 measurements are much less accurate than desired.
It should be noted that AirBeam3 calibration equations do not account for relative humidity. Prior academic research indicates high relative humidity can significantly impact the measurements from light scattering sensors. Also, given the geographic and seasonal variation in aerosols around the world and the variable response of light scattering sensors to differing aerosol compositions, the AirBeam3 measurements will be more accurate in some settings than others.
We look forward to learning more about AirBeam3 performance as additional evaluations are performed. Please contact us if you undertake an evaluation of the AirBeam3 and generate data that can be publicly shared as we would be happy to disseminate your findings via the AirCasting network.
The AirBeam3 calibration equations were developed by Chris C. Lim, an assistant professor in the Department of Community, Environment, and Policy at the University of Arizona.